In this tutorial we will be assembling a mug with its handle and its
lid. We will combine the previously learned commands from the earlier tutorials
with the following commands:
Let's start by creating the mug body part and call it tut4-mug. First we will create the default datum planes.
create>datum>plane>default
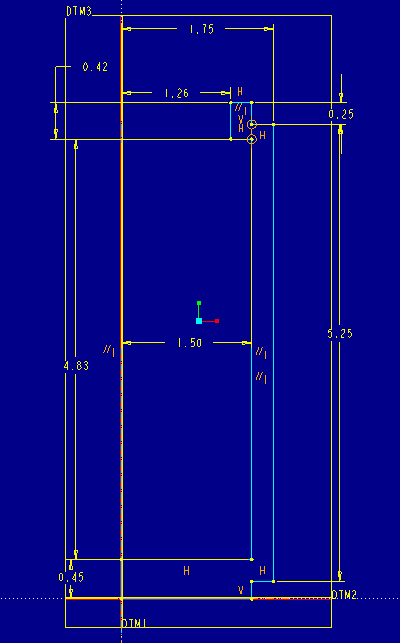
Once the datum planes have been created, we will create a revolved part (sketch shown in Figure 1) using the following commands:
create>solid>protrusion>revolve | solid | done>one side | done
Pick DTM3 as the sketching plane and DTM2 as the top reference plane.
Remember to use what you have previously learned for aligning, dimensioning
and regenerating geometry and datum planes. Once you have drawn the geometry
and regenerated successfully, pick done.

Figure 1.
Two rounds need to be added to the mug body (highlighted in red in Figure 1a). Pick the bottom edge only using:
create>solid>round>constant | Edge Chain | done>Tangent Chain | (select bottom edge) | done
Set the radius of the bottom edge to 0.20. Circular edges are broken into two semicircles. The Tangent Chain option picks both of them in one click.
Add another round on the top edge with a radius of 0.10.
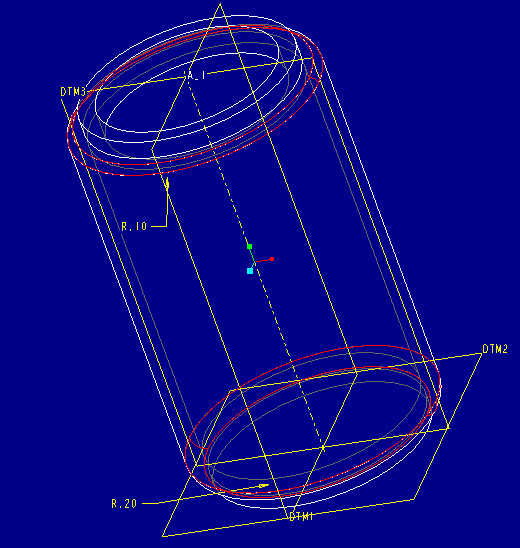
Figure 1a.
Next we are going to use the sweep command to attach the handle to the mug. Sweeping is a more advanced feature operation which is done in two parts. Instead of sweeping a sketch profile along a linear (extrude) or circular (revolve) path, a path sketched by the user is used. The first stage is to sketch this path (trajectory):
create>solid>protrusion>sweep | solid | done>sketch traj>Use Prev | okay
You can use the same datum sketch plane and horizontal datum plane as above by choosing Use Prev when prompted for a sketch plane.
Start drawing the trajectory at the arrow on the right side of the mug as shown in Figure 2 . Do not forget to align the beginning and ending points to the side of the mug. Place dimensions as shown.
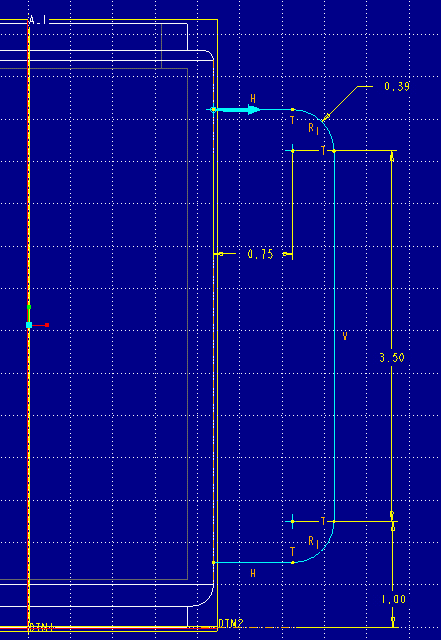
Figure 2.
Once the trajectory has been sketched and properly dimensioned, perform the following:
regenerate | done>merge ends | done
Now notice the intersecting chain lines on the center left-hand side of the screen (see Figure 3). This view is normal (perpendicular) to the first line segment of the trajectory (the one with the arrow and the chain line intersection marks the location of the first point of the trajectory. We are going to use this as the cross section for the handle during the sweep.
Zoom in on the cross hair and draw the sketch as shown in Figure 3.
Make sure you place the sketch as shown in the figure. The bottom of larger
arc should be tangent to the vertical chain line after regeneration. All
dimensional constraints need to be tied to either elements of the sketch
or to the chain lines.
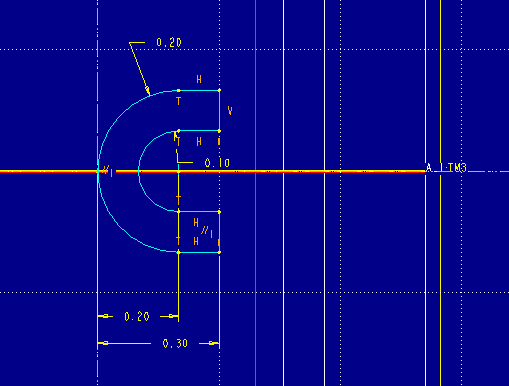
Figure 3.
Once this feature is done, the mug body is complete. Make sure to save your file at this point.
Now create a new part and call it tut4-lid.
Again, create the default datum planes.
Create the base feature for the lid as a revolved protrusion. Use the same sketch (DTM3) and reference (DTM2) planes you used for the mug body. Sketch the geometry shown in Figure 4. being careful to align and dimension as needed. Remember to align the centerline with DTM1.
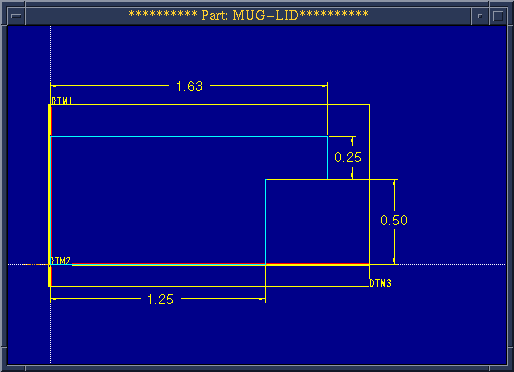
Figure 4.
We are now going to cut out the material on the bottom of the lid:
create>solid>cut>extrude | solid | done>Both Sides | done
Use Previous sketch and reference planes. Sketch the geometry
shown and dimension accordingly as shown in Figure 5. Make sure to
align the angled line to DTM2 and the horizontal line to the side
of the lid. Note the dimensional constraint scheme. You should tie the horizontal
dimensions to DTM1 since the vertical side of the lid you see is the limiting
extent of a curved surface which varies in distance to the angled end of
the sketch. After you have regenerated successfully, pick done, and make
sure your arrow is pointing in the correct direction for the cut.
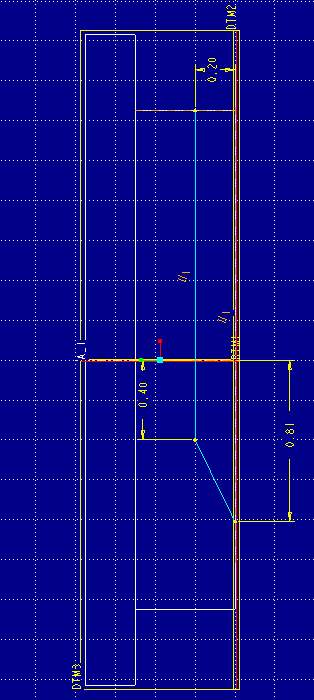
Figure 5.
Now we are going to use the shell command to cut out the inside portion of the lid. Shelling is a technique used extensively in the design of injection molded plastic parts. Shelling allows you to define the exterior form of the part through solid modeling operations like the ones used to date, and then 'hollow out' the interior with the shell command. You can define a constant wall thickness when shelling out or select surfaces with different thicknesses. There has to be an entry point for the shelling (i.e., you can't create a void inside of a solid), so you must define the shelling operation by picking the surface to be removed:
create>solid>shell
Pick on the top surface of the lid and click done.
The next menu, the feature reference menu, queries whether
you want to add additional references for specifying different thicknesses.
Pick Done Refs.
For the thickness type in 0.10 and press enter.
Next pick OK and the shell should be created. Check to make sure
by comparing with Figure 6.
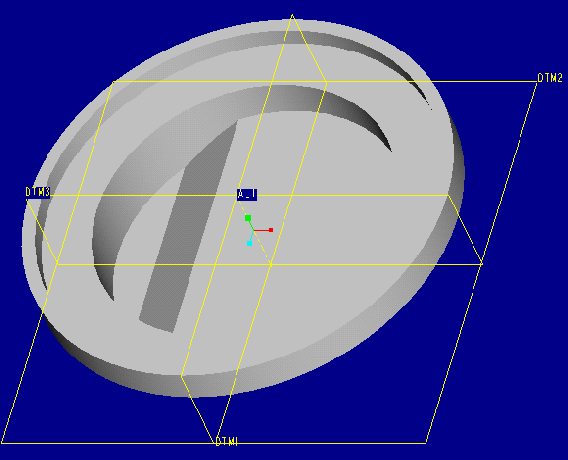
Figure 6.
Next we will create a punch through the lid to create a place to drink through (see Figure 7).
create>solid>cut>extrude | solid | done>one side | done
Use DTM2 as your sketch plane and DTM3 as your reference plane.
Feel free to zoom in on the area where you are sketching. Sketch and constrain the notch as shown in Figure 7. Don't forget the align a horizontal center line to DTM3.
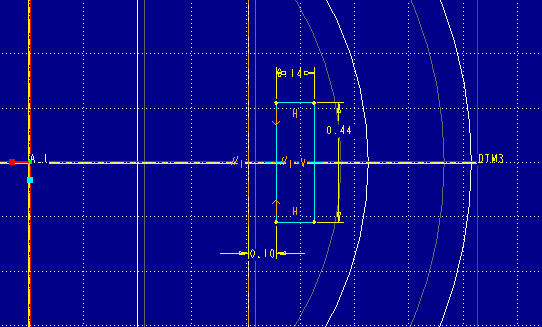
Figure 7.
After successful regeneration pick done and make sure to orient the arrow
to the portion of the notch to be removed. The cut can be made Thru Next.
The end result should look like Figure 8.
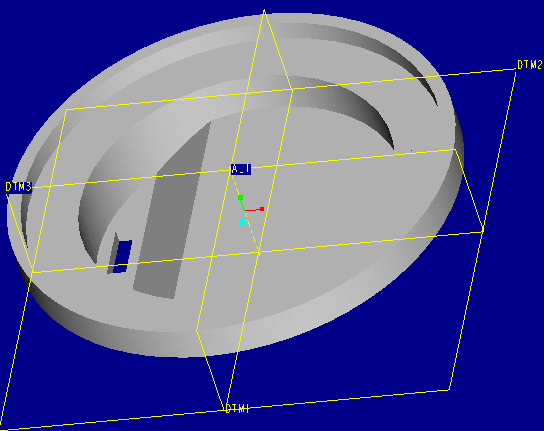
Figure 8.
The last part of the tutorial will invovle a new 'module' of Pro/E, Assembly. In this module, you will bring the two parts, the mug and lid, together into the assembly. The parts are not copied, but referenced, in the assembly. This means that you can't move or delete the part files referenced in the assembly.
Create a new assembly with:
mode>assembly>create> enter tut4-assm
Initially, the assembly is empty. We create the assembly by placing parts or other assemblies (called 'components') in the assembly window. The first part we will bring into the assembly is the mug:
component>assemble> enter tut4-mug
The mug part is retreived and placed in the assembly window.
Now a second part will be placed in the assembly. Pick on assemble again and type in tut4-lid.
Notice that two other windows open at this point. One window, the component placement window, helps track the progress of constraining the new part (component) into the assembly. The other window is the part window of the part you are bringing into the assembly.
The first thing you will want to do is click on the in assembly check box so that you can constrain the new component in the assembly window, rather than having to switch back and forth between the part and assembly windows.
In order to bring in another component, it must be constrained to the initial part. Even though you can see the lid in the assembly window, it will not stay there if you clicked on done at this point. Constraining is done through two primary types:
These two options, plus others, are found in the Place menu.
We will start with a mate.
First pick the top-most (outer ring) surface of the mug. Then pick the matching surface of the lip for the lid (you will need to use query select to pick this hidden surface). Imagine these two parts going together to figure out which surfaces to pick. Zoom, rotate, and pan as necessary to pick your surfaces.
Notice that the lid has moved slightly, but not in place on top of the mug. We have only constrained in one of the three dimensions so far.
Next align axes. First pick axis A1 on the lid and then axis A1 on the mug. Now the lid moves over top the mug.
The prompt line now reads:
The component can now be placed.
This indicates that the two parts are fully constrained. The axis alignment constrained movement in the other two dimensions. Though the lid could still 'spin' on top of the mug with these defined constraints, the default orientation is the one we want.
Pick done on the Comp Place menu.
The final assembly should look like Figure 9.
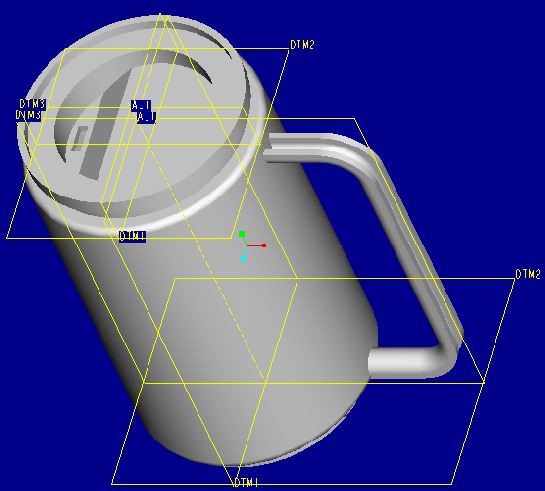
Figure 9.
NOTE: If the lid is oriented the wrong way, an additional constraint can be added to the lid. This is done by:
component>redefine>(click on lid)>Add Constrnt
By constraining the appropriate datums, you can rotate the lid around. For example, aligning DTM3 on the lid to DTM1 on the mug, you can rotate the sipper hole 90 degrees counter-clockwise.
Printing can be accomplished in a similar manner to printing parts. Printing is done through the assembly>interface menu.
You have now completed Tutorial 4.